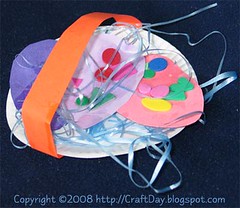
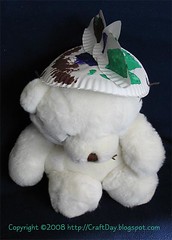
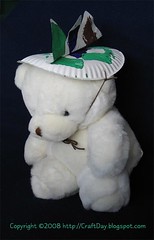
Thursday, March 20, 2008

Easter basket

easter_basket

This was created at our local Ontario Early Years Centre.

Materials:
  • small paper plate (shown is 15cm / 6" in diameter)
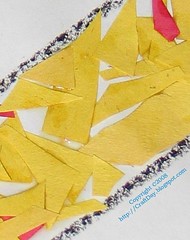
  • "Easter grass" (decorative straw)
  • white glue
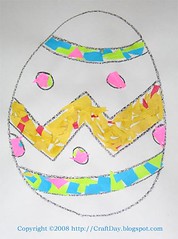
  • easter coloured construction paper cut into egg shapes, approximately 6.5cm x 9cm (2.5" x 3.5")
  • markers, felt shapes, crayons, sparkles etc for decorating the paper eggs
  • strip of coloured construction paper for the handle (approx 2.5cm x 18cm / 1" x 7")
  • stapler

Instructions:
  • glue the "Easter grass" to the top of the plate
  • decorate paper eggs as desired
  • glue decorated paper eggs on top of easter grass
  • staple handle across the plate (fold the edge of the handle under the outer edge of the plate and staple) -- be sure that the staple is completely folded and there are no sharp edges to cut little hands
  • enjoy your Easter basket!

Sunday, March 09, 2008

Stegosaurus hat

stegosaurus_hat_1(This idea came home from school.)

Materials:

  • whole paper plate (the one shown is 23 cm (about 9") in diameter)
  • paper plate cut in quarters or sixths (depending on how much mileage you ant to get out of them) -- note the rounded corners in the photo to the right
  • bits of sponge for dipping into paint (the ones used were approximately 6cm x 4cm (2.5"x1.5"))
  • Stegosaurus coloured paint (purple, brown and green)
  • two 40cm (16") pieces of Stegosaurus coloured yarn (purple, brown or green)
  • hole punch
  • stapler

Instructions:
  • have child sponge paint of different colours on the bottom of the whole plate
  • have child sponge paint of different colours on both sides of the pieces of plate (do one side, let it dry, do the other)
  • fold the plate pieces at right angles, along the outer edge
  • have an adult staple the plate pieces along the middle of the painted whole plate, akin to a spine (make sure the staples are completely folded over with no sharp edges exposed)
  • have an adult punch one hole at the top and one hole at the bottom of the plate
  • adult to tie one piece of yarn through each hole
  • place hat on child's head and tie under child's chin

WARNING:
The finished product could be a choking hazard if child left unsupervised. Child safety is your responsibility!

stegosaurus_hat_2 stegosaurus_hat_3 stegosaurus_hat_4
stegosaurus_hat_5 stegosaurus_hat_6

Tuesday, March 04, 2008

Exploring patterns with paint (and toy cars)

paint_pattern_1

(These ideas came home from school.)

Materials:
  • large sheet of paper
  • washable paint of various colours
  • washable (plastic) toy cars or trucks with interesting tire treads

Instructions:
  • assign one vehicle per colour of paint
  • have child dip vehicle tires in paint and then drive all over the paper
  • explore patterns on the paper
  • explore repeating patterns overtop each other (within same colour)
  • explore what happens when paint colours mix
  • explore which colours show up on other colours

paint_pattern_2

paint_pattern_3


paint_pattern_5


Of course, if you really want to get into the swing of things, get them to paint a car with using the wheels of a car!

paint_patterns_car

Sunday, March 02, 2008

Paper towel roll bird feeder

bird_feeder(This idea came home from school.)

Materials:

  • sturdy paper towel roll, cut to a 13cm (about 5") length
  • hole punch
  • sturdy string or yarn 30cm (about 12")
  • lard
    [The debate rages on as to whether or not lard is bad for birds, you'll have to do your own research and come up with your own conclusion about the suitability of this ingredient. While we're at it, you may want to consider whether you feel putting up a bird feeder has a negative impact on birds' natural ability to find food or migrate south. But I digress.]
  • bird seed (if you have squirrels in your area, consider getting squirrel proof bird seed)
  • cookie tray

Instructions:
  • punch two holes opposite each other in the top of the paper towel roll piece, about 2 cm from the edge of the tube
  • thread the string or yarn through the holes and tie both ends together tightly
  • spread a thin layer of seed on a cookie tray
  • rub lard over the paper towel roll (cover the child's hand with a plastic baggie if you don't want to deal with little lardy hands)
  • roll the lardy paper towel roll in the seed, until most of the lard is covered with seed
  • hang on a tree and wait for the birds to come!
(Photo shows bird feeder wrapped in a plastic bag for transport. Do not hang bird feeder while covered with a plastic bag!)

WARNING:
The finished product could be a choking hazard if child left unsupervised. Child safety is your responsibility!

Saturday, February 23, 2008

Paper snowman

snowman

(This idea came home from school.)

Materials:
  • large sheet of blue construction paper
  • white paper cut into three circles (large, medium and small)
  • coloured construction paper cut into the shape of mittens
  • optional: black construction paper cut into the shape of a hat and two round eyes
  • optional: orange construction paper cut into a triangle
  • optional: red construction paper cut into the shape of a mouth
  • glue
  • white tempra paint and big round paint brush (alternately, an old bottle cork will do)
  • optional: other colours of paint to add / decorate hat, eyes, nose, mouth etc

Instructions:
  • have child glue the circles -- largest at the bottom of the sheet, smallest at the top
  • add mittens, hat, eyes, nose and mouth
  • dab paint to make snowflakes falling from the sky (the paint on this image was dabbed on with an old bottle cork)

Tuesday, February 19, 2008

Paper mosaics

Does the crafter in your house hate throwing away all the little scraps of coloured paper? Not sure what to do with it all? Just glue it all down!

mosaic_egg

Materials:
  • colouring sheet (or draw something free-hand)
  • glue
  • lots of small pieces of paper of different colours (larger pieces for younger kids, smaller pieces for kids with more patience and hand-eye co-ordination)

Instructions:
  • apply glue to colouring sheet
  • apply scrap pieces of paper to glued area in colouring sheet


Close-up:
mosaic_egg_zoom

Tuesday, February 12, 2008

Homemade Valentine's Day cards

Quick and easy homemade Valentine's Day cards.

valentine_1 valentine_2

Materials:
  • letter sized card stock or sheets of perforated "postcards"
  • scissors
  • optional: paper-cutter if using card stock
  • red crayon, pencil crayon or marker
  • red and pink construction paper cut into hearts of varying sizes
  • white glue
  • heart shaped stickers
  • optional: stamps, markers, glitter etc for additional decorating

Instructions:
  • optional: if you want to have identical text on each of the cards (such as "Happy Valentine's Day" or "From your friend" then you may want to run the sheets through the printer before you cut them down to size)
  • cut card stock into quarters or perforate postcards
  • draw a large, red, free-hand heart on each card
  • have child glue construction paper hearts as desired
  • let glue dry
  • have child apply stickers, stamps or other decorations as desired
  • voila!

valentine_3 valentine_4 valentine_5